EventStream – Virtual Event Case Study – Combining Recorded Video, Live Video and Live Auction

August 12, 2020

EventStream - Virtual Event Case Study - Combining Recorded Video, Live Video and Live Auction

Summary

Using the full range of features available to ClickBid’s EventStream, you can accomplish a virtual hybrid event that includes a pre-recorded video(s), an on-camera live interview, a live auction with an auctioneer and a paddle raise. Doing this requires knowledge of OBS and using multiple scenes to combine the elements.

How Does it Work

A private school used ClickBid to conduct a hybrid event that utilized all the features above. The overall event took place over several hours and was managed by an experienced OBS user. 

EventStream Collage

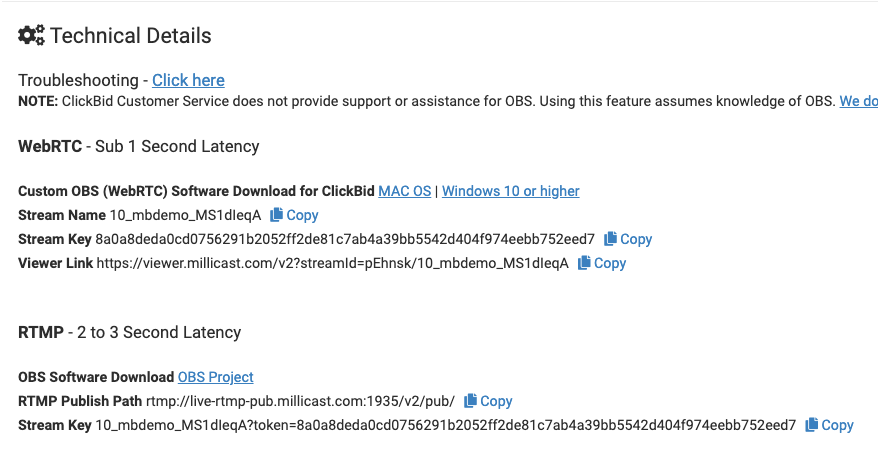
To get started, you will need to download a copy of OBS software. To achieve real-time (WebRTC) download a modified version of OBS that allows WebRTC. To use the latest version of OBS (RTMP) that adds a small delay to real-time video, click here.

With both versions you will need to add your ClickBid EventStream details to the Stream preferences in OBS. This can be found in your ClickBid Admin under Event Central > Live Broadcast.

ClickBid EventStream Details

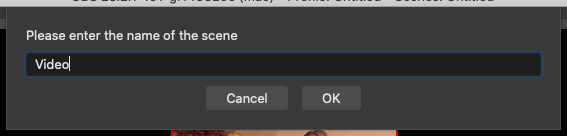
Now that your OBS software is connected to ClickBid’s EventStream, you can add Scenes. I usually recommend that your first Scene is either a graphic, text or video loop that says “Our Broadcast will Begin Soon.” This is where you would start your broadcast. It gives you some time to dive into your program.

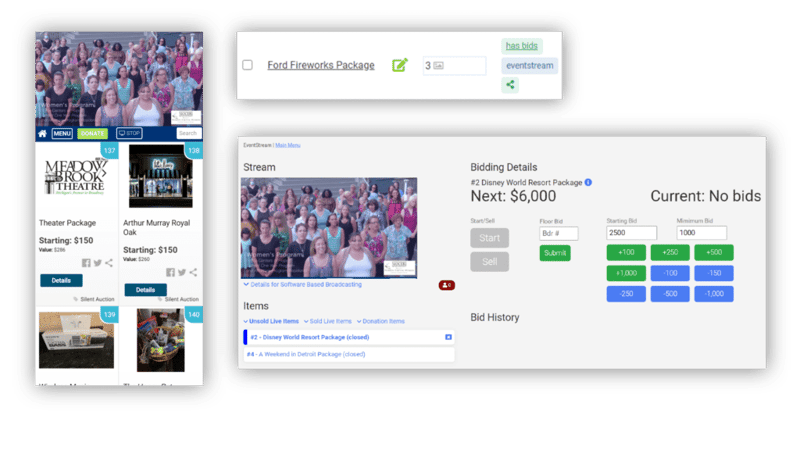
Scenes in OBS are essentially different elements that you can “cut” to during your broadcast. They can be still graphics like I described above, web pages such as a leaderboard from ClickBid, pre-recorded videos, live cameras of an auctioneer and more. When you want to make a new element, just press the + symbol below the Scene box. Use unique names so you know what each scene represents (Live Camera, Sponsor Commercials, etc).

OBS Scene Name

When you are broadcasting to your bidders, you simply click on a scene to make that “live”. This will send that scene to your bidders so they can see your broadcast. To start your broadcast just press Start Streaming from the menu on the right. When done, press Stop Streaming below it.

Tips

I recommend conducting a “Dry Run” so that you can test your settings and scenes before the event. In ClickBid go to Event Central > Live Broadcast and switch the dropdown to Dry Run. Then, enter your bidder number and few other (separate by comma). This will allow only those bidder numbers to see your Dry Run broadcast. You can test, tweak, test again as much as you want before the event.

I also highly recommend having a loop created of your sponsors. You can cut to this while you’re waiting for the event to start, in between sections or even at a specific time. If you don’t have resources to do this, I recommend an online service like Fiverr.com where you can search for “video loop” to find a cost effective freelancer to take your logos and build an cool loop that you can use. You can also hire a production company to produce a bigger video that you can play during the event.

Lastly, record someone walking through how to bid. This can be done with your phone and a recording app or professionally (again Fiverr.com or a production company).

Get The Latest Updates
Subscribe To Our Monthly Newsletter

No spam, notifications only about new products, updates.

Become a subscriber

Subscribe to our blog and get the latest updates straight to your inbox.